Build and test
Everything below happens in StageTime SDK → Build Window. Dock it next to the Inspector.
There are two ways to try your world, from fastest to most realistic, and then you upload it:
| What it runs | Use it for | |
|---|---|---|
| Play in your project | your scripts as plain C#, one offline player | layout, logic, UI |
| Build & Test | the real StageTime app on your PC | everything: sandbox, networking, pickups, seats |
| Upload | a bundle per platform on StageTime | putting the world on StageTime |
The Build Window
- StageTime Account. Press Sign In. Your browser opens stagetimevr.com, where you check the code Unity shows and allow it. You never type your password into Unity. The rest of the window appears once you're signed in, and you stay signed in (in every project) until you sign out or don't use the SDK for 90 days.
- World. Pick your world's scene, or open it and press Use Open Scene. The scene must be open, with exactly one root object that has ST World.
- Details. The Name players see (up to 64 characters; empty uses the scene name) and a Description (up to
500 characters), plus the world's Spawn Point and Skybox. The name and description are kept for you in
the project's
UserSettingsfolder and sent with every upload. StageTime gives the world its id and version number when you upload it. - Platforms, Project Setup, Build and Test and Upload to StageTime, described below.
Preview with Play
Open your world's scene and press Play. The SDK notices the ST World and starts a local preview: you are the only player, the room's master and the owner of every object.
- Fly with W A S D, Q / E for down and up, and hold the right mouse button to look around.
- Click an object to run its script's
Interact(). World-space UI works with the mouse. SendCustomEvent, delayed events,GetProgramVariable/SetProgramVariableandOnPlayerJoined(for you) work.
The preview runs your scripts as normal C#, so it does not check the allowed API, sync values or run pickups and seats. Always finish with Build & Test.
Build & Test
In the Build Window, press Build & Test (Desktop) or Build & Test (VR). The SDK:
- builds the Windows bundle (a few seconds after the first build),
- starts StageTime with
-world <your world.json>, and - StageTime puts you in a private room with your world.
If StageTime is already open on this PC, there's no need to close it: Build & Test sends it the new build, and it leaves its room and opens your world in a new private room. It stays in the mode it's in (VR or desktop). So you can leave StageTime running, change your world, and press Build & Test again.
By default it starts StageTime through Steam, so Steam must be running. To use a different copy, press
Local Build... and pick its StageTime.exe; Use Steam switches back.
Script errors appear in the Console with the file and line, like normal C# errors:
RotatingCube.cs(14,9): error STC0102: 'UnityEngine.GameObject.Find' is not available to world scripts
Test with more players
Start StageTime yourself with the same room name on several PCs (or accounts) to test networking:
StageTime.exe -desktop -world "C:\path\to\world.json" -worldSession my-test-room
Everyone needs the same world.json folder. Things worth checking:
- Click things from both clients: the second player has to take ownership first.
- Leave and rejoin with one client: late joiners should see the current state.
- Close the first client (the room's master): the other player becomes master and takes over its objects.
What a build does
Build & Test and Upload both build the world. The builder:
- copies the scene (yours is never changed; unsaved changes are saved first),
- compiles every script to WebAssembly and checks it only uses the allowed API,
- replaces each script with its compiled data (StageTime adds networking and interaction when the world loads),
- builds a bundle per platform (Build & Test builds Windows only), and
- writes them with a
world.jsonmanifest toBuilds/WorldBuilds/<scene name>-<id>/local/. The folder name is the scene's file name and the start of its asset GUID, so it stays the same when you rebuild.
Before building it checks your project setup and prints a warning for anything that would make the world look wrong in StageTime. The Build Window's Project Setup section shows the same check.
The first Android build takes a while because Unity imports the project for Android. Later builds are much faster.
Platforms
| Platform | Unity module | |
|---|---|---|
| Windows (desktop and PC VR) | always built | included |
| Android (Quest, Pico, phones) | always built | Android Build Support |
| macOS | optional | Mac Build Support |
| iOS (iPhone, iPad) | optional | iOS Build Support |
| visionOS (Apple Vision Pro) | optional | visionOS Build Support (Unity on a Mac only) |
Tick the optional platforms in the Build Window's Platforms section. Like the name and description, the ticks are
kept for you per world in the project's UserSettings folder. Each platform needs its own bundle, because Unity
builds shaders and textures separately for each one. Players on a platform without a bundle can't load the world.
Build & Upload builds and uploads Windows, Android and every ticked platform. If a module it needs isn't installed, the button stays disabled and says which one to install (or which platform to untick). Add modules in Unity Hub (Installs → Manage → Add modules).
Upload to StageTime
Uploading needs StagePass on your StageTime account. If your account isn't linked to StageTime on your headset yet, link it first, then subscribe to StagePass in StageTime and press Refresh in the window.
In the Upload to StageTime section:
| Field | |
|---|---|
| Upload To | A new world, or one of your worlds on StageTime to upload a new version of it. Picking one loads its name, description and who can load it into the window |
| Who Can Load It | Private (only you, and you play it alone) or Unlisted (anyone signed in who has its ID). Copy ID copies the world's ID |
| Thumbnail | A PNG, JPEG or WebP image (up to 5 MB). Required for a new world; an existing world keeps its current thumbnail if you don't choose one |
| Notes | Optional: what changed in this version |
Press Build & Upload. The SDK builds Windows, Android and the ticked platforms, checks each bundle's size against your account's
limit, uploads the bundles, world.json and the thumbnail, and makes the result the world's live version. The
window shows the new version number. If the build or upload fails, or you cancel it, nothing changes on StageTime:
the live version stays as it was.
Share an unlisted world
Anyone signed in with an Unlisted world's ID can open it, even when you're offline. Press Copy ID in the upload section and share the ID.
Open it from Steam
-
In your Steam Library, right-click StageTime and choose Properties.
-
On the General page, under Launch Options, type
-worldfollowed by the ID:-world 00000000-0000-0000-0000-000000000000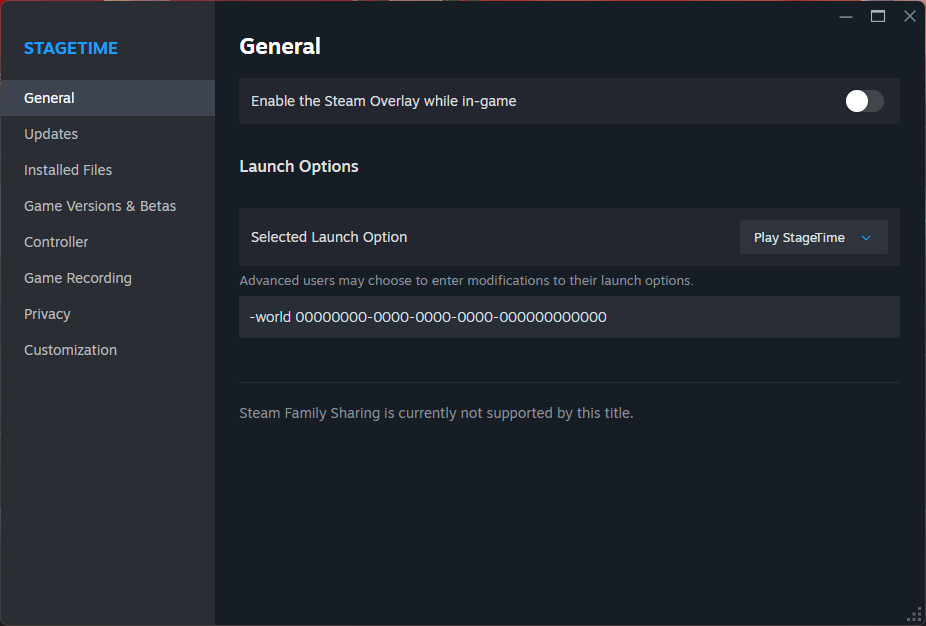
-
Close the window and press Play. StageTime opens straight into the world.
-
To go back to normal, clear the Launch Options box.
Everyone who opens the same ID joins the same room. For a room of your own, add a room name and share it with your friends:
-world 00000000-0000-0000-0000-000000000000 -worldSession my-room
Without Steam, pass the same arguments to StageTime.exe. On Quest there is no launch link yet.